Minggu, 28 April 2013

Instagram and a Linky Party

There's a fabulous new idea over at What the Teacher Wants.
Every Tuesday they're going to host an Instagram linky party.
 
Currently they are hosting a linky party so we can hook up our usernames.
Below is my profile page, and my screen name is slfarrell6869.
 
 
Here's my button which I put up on my Instagram page.
 
And here's the link back to the linky party
 
 
and


It's almost May - here's a little freebie

It's almost May and I have a few freebies for you. 
Both of them are Calendar numbers for May.
You can choose between two themes.
 
This one is floral.


This next one is simpler


Rabu, 24 April 2013

My favourite parts of my classroom...

Well, two posts in one week is rare for me, and three posts is purely unbelievable right?
Well I've been inspired to join up with this week's


The idea is that you share your favourite 3 parts of your classroom.
So, given that my room is a complete mess at the moment, I had to spend a bit of time tidying before I could take photos.   My room is not perfect, it's not cute, but it's organized and it's comfortable.  A lot of learning goes on here, it's just not colour coordinated, pattern or theme based, or anything like that


Favourite Spot #1 - My teaching area

This is my absolute favourite part of my room.  Here we have my smart board which I use constantly.  Only 2 of 18 classrooms in my school have one of these, and I feel fully lucky to have one and I make sure I use it as much as I can.  Also in this picture is my laptop (my personal one) and my stereo from home that I use to teach music to 100 primary aged children once a week.   The final important thing in this photo is my purple sofa.  It looks brown in the photo, but believe me it's purple.  I bought that sofa before I met my husband and he hates it!   So when we moved into our current house, it got booted out of the living room and replaced with something more comfortable.  It's an apartment sized sofa, so perfect for a woman, but a bit small for a 6 foot 1 man.  So here it is.  So far the kids have not caused any damage - let's cross our fingers that it stays that way.   I often teach small groups on this carpet.  I sit on the sofa, or on the floor in front of it.  I put any materials I need up on the sofa, or beside me on the sofa.  I sit here to teach guided reading.  This truly is my favourite part of the room.


Favourite Spot #2 - My Book Nook

Here we have my second favourite part of the room.  This is my secondary teaching area because it's right in front of the white board.  I sit in the rocking chair when reading aloud to the class.  The special helper gets to use the rocking chair as well.  Behind the chair is one part of my class library.  This part has library books which I switch out each week, and two shelves of my novels for the more avid readers.  I also keep special books on the ledge so that the kids can read them after I have finished them.  Yesterday I read them the Lorax as you can see.  We're also working our way through the Mouse and the Motorcycle.

Favourite Spot #3 - Literacy Centres

So here we have my literacy centres.  We use them for Word Work when I do the Daily 5.  On the shelves are baskets of magnetic letters, a mini chalk desk from Fisher Price that I had as a child, small boxes of letter   and memory games, and then 4 tubs of centres that I have either made, or found on Teachers Pay Teachers. The top shelf has the Book Boxes for 2 of my reading groups (red and yellow groups)  We use them for Read to Self during the Daily 5.


Senin, 22 April 2013

My MOM is my Superhero

I am super, super, super excited about my latest unit.
I have been working very hard on this for the past month.
 
Introducing...


 TO DOWNLOAD
 

I even created my own original clip art for this unit.
Below is a peek at what's in this unit.


And below are some more images from the unit.
I can't wait to try this out with my class next week.
Stay tuned for more photos as we go through this unit.


So if you'd like to try this out please
to download

Minggu, 21 April 2013

Happy Earth Day!

 
Happy Earth Day everyone.  Here's a quick post about a little mural we made last year.
 
Check out this post here on how we made this Earth-Friendly globe.

Sabtu, 06 April 2013

Easy tips to create Backlinks to your Blog

Backlink is a link on a website (including blogs) that leads back to your website / blog.One great way to create back links is Posting comments in other people's blogs. Every time you post you are able to include your name and your website address in some comments. 


Backlinks

It’s important to gain backlinks honestly, and if a lot of other sites link back to you, you will naturally get more traffic to your page..The best thing you need to rank high in Search Engine is Building High Quality Backlinks . More high quality backlinks you have more visitors / rankings you get in SERPs .

6 Easy Ways to Build Backlinks

1.Blog Comments :
Commenting on relevant blogs in your niche is one of the best methods to build backlinks to your site. Its the much easy and traditional way to create backlinks . But due to spam , most of bloggers doesn’t approve your comments then a great way to find dofollow blogs is by using Free Blog Commenter or google search operators .Also make sure to follow these tips:

1. Never write one line comments As Thanks You , Great Post, Keep it Up ! Etc. Write comments related to article and make sure your comment is having at least 2 Lines .
2. Never add links in your comment body .
3. Always use real name while commenting .


2.Guest Posting :
Guest posting is the advanced way to get backlinks from popular websites . This technique of Making backlinks is common now a days and It helps not only in obtaining backlinks, but helps you build a brand for your site and gets you laser targeted traffic. A few of the popular blogs that accept guest posts are Traffic Generation Cafe, IBlogZone, FamousBloggers, DailyBlogTips & ShoutmeLoud..

3.Backlinks And Social Media
 Bookmarking your websites on Social networks like Digg, StumbleUpon, Facebook, & Twitter can help you get backlinks. You may have seen nearly every blogger using Social Sharing Plugins in articles footer . So simply share your articles at Social Websites to get High Page Rank and visitors too . Now a days this technique is very popular and nearly every blogger makes use of it .

4. Article Marketing :
Promoting your site with the help of article marketing is a very well-known strategy to build up backlinks as well as traffic.Well still this method is followed by some Professional SEO Experts And Bloggers . It requires a lot of care while doing the stuff .Submitting articles to High Page Rank submission website can help you to get a lot of Traffic from Search Engines .You need to be choosy while selecting your article directories out there as there a lot of them that are more like link farms and google’s recent panda update devalued these sites. Few of the well-known article directories are Ezine & GoArticles.

5. Forums:
Links from other sites to your site are basically a ‘vote’ that tell search engines you are trusted and you are a good resource for whatever your content is about. Recently we’ve come across this fact that there are hundreds of dofollow forums with high PR. Forums are places where you can network with like-minded people and use your links during your sign up stage.

6. Directory Submissions :
There are a lot of directories that you can submit your site to.  Submitting your links to directories like Yahoo & Dmoz will help you build up backlinks to your site. Although you will find a lot of free directories that you can submit your site to, we would not recommended that as obtaining links from bad neighbourhoods is also not good for your overall SEO strategy.

Feel free to let us know if you use some other strategy, methods to build backlinks to your site. 

Share your views in the comments below.


How to use Filezilla: Free FTP Client for Uploading Files to Server

Hi frnd Now this tutorial will show you  how to use FileZilla to upload your website.This tutorial only deals with how you can transfer a file to your web server using a free FTP client known as FileZilla.FileZilla is a powerful and free software for transferring files over the Internet. 

First, go to the FileZilla download page.Once you have downloaded the program, you will have to install it. Go to your desktop and doubleclick the file that you have just downloaded.Once you have the FileZilla client installed and activated on your computer, enter the domain name in the address field.The username and the password you need to type in are the same as the ones you use to log in to your cPanel. The FTP port is 21 and is filled in automatically.

I have been using FileZilla for almost over a year now and can vouch that it’s one of the best free available FTP clients available.

The FTP client software communicates with a FTP server which is managed by your host. For the FTP client to connect to the FTP server, it will need the following information, all of which should have been provided by your host upon sign up:

1) Host Name
This is the name of the ftp server(Computer Server) which contains the files which manages your blog. or the name of the FTP server for your website. For example, your host may tell you that your FTP hostname is "ftp.pinkusay.com".Typically, this is either myblog.com or ftp.myblog.co.

2) Port Number 
By default, FTP uses port number 21.
The Internet uses port numbers for all different protocols. For example, you view your blog over port 80, which is used for HTTP. A list of official and unofficial port numbers is available on [Wikipedia].

3) User Name&Password
The user name and password of the account, created by your host, which is authorized to transfer files to, and from, the computer hosting your blog.

Below is a screenshot of FileZilla


FileZilla 300x297

Click Quick connect and the file listing will appear. Find the www directory and double click on it.Then, select the files to be uploaded and drag-and-drop them under the www folder. Wait for the transfer to be completed.

As FileZilla proceeds to upload your file to your site, you should be able to see the upload progress in the bottommost window pane in FileZilla. When the upload has completed, you can disconnect from your website. Do this by clicking the "Server" menu followed by the "Disconnect" item.


Don't Miss These Killer Articles on Facebook:

3.How to Add Scrolling Recent Posts Widget For Blogger?

Jumat, 05 April 2013

Best Reason to use Blogger instead of Wordpress

Hello friends The question is still unanswerable because WordPress and Blogger platforms both are good and having their own features.we all know that WordPress blogs are increasing and so as the blogspot blogs.Both are top platforms and are developing and advancing day by day… 

 Why Blogspot Blogs is better then Wordpress ? ” .  And every one gives you the same answer :Blogspot  is better and having advantages . That’s true and also I have the same view.

Blogging is becoming more and more common these days. There's a blog about virtually everything. And not without reason. Blogging is a great way to express and share your thoughts with the world.Blogger is best for individuals and people who may love to blog for Money or just fun. It will improve your web designing skills because there is a lot to learn here and can apply all HTML4, JavaScript and CSS3 creative hacks to your blog but with wordpress you are limited to plugins alone, no scope for learning in WP

Still, to get a clear picture of the two platforms I’ll provide the newbies with some points showing the difference between Blogger & WordPress, so that they can select anyone of them.

Points About Blogger

1.Blogger blogs are free hosted journals that is operated by Google means No hosting Charges as Google is providing awesome free hosting service for blogspot blogs.

2.
Easy to understand and work with, especially for newbie bloggers.Blogger is flexible,highly secured and indeed any Blogger's first choice.

3. A lot of cool templates as well as free and good looking templates are available for blogger blogs .

4.Blogger requires less investment and less technical knowledge as it doesn’t require any hosting. You don’t need to spent money for hosting, you just need to buy a domain name from sites like GoDaddy.Bigrock,Hostgator and pay a very less amount yearly

5. Easy Layout Editing and customization . HTML templates are easy to edit in compare to WordPress Themes .

6.
Blogger is a secured platform and thus the blogspot blogs are rarely hacked.There is very less spam in case of blogger blogs . As there are no Trackback And Automated commenting System .

7. Blogger added features like robots.txt, meta description, no-follow and no-index commands etc.. to optimize blogs for search engines.

Following are some limitations on content storage and bandwidth per user account in Blogger:

Blog description = 500 characters. HTML mark up not supported. 
Number of blogs = 100 blogs per account. 
Number of pictures = Up to 1 GB of free storage. Stored at Picasa.
Static Pages = Limited to 20 stand-alone pages.
Team members (those who can write to a blog) = 100 per blog. 
Size of pages = Individual pages (the main page of a blog or archive pages) are limited to 1 MB 
Size of pictures = Pictures are scaled to 1600px 

Points about WordPress.
1. To run a wordpress blog you must have a good hosting . Hosting costs are expensive , so you have to invest something before running a Wp blog .A little time is needed to get adjust with WordPress.

2. Has a huge plugins store with every need.You just need to search for what you want.

3. Provide a great range of free theme in the templates store but don’t provide dynamic views And Also hard to get a theme that suits your blog. You have to buy a good looking theme first.

4.WordPress fixes their bugs in every new version occasionally. Sometime ago WordPress was updated to version 3.5 and this made their blogs more secure and customizable. 

5. Costly Troubleshooting and Self hosted WordPress blogs require more investment & technical efforts as they require hosting facilities. So you need to spent money for hosting on sites like Godaddy, every month or every year.

6. Your template customizations and coding can be backed up, so that when you switch to a new template you don’t require to work once again on ‘em. 

7. WordPress is also a safe platform but Security is the most serious issue of a self hosted wordpress blog. No matter you are a pro blogger or WordPress Expert but you have to admit that you have a fear of being hacked . You have to do a lot of efforts to ensure the security of your blog .the no. of hacking reports are more here. You need to take some security measures to save your blog from hackers.

8. Wordpress blogs are more vulnerable to attacks:WordPress is full of spam. Everyday you will get a lot of spammed comments that would be a headache for you . You have to do some changes in order to limit all that spam .

Finally I want to say that, you don’t need to think much about platform because if you’re honest and hard worker with your writing then everything is correct.Development is going on and growth is on its way. It’s not that a blogger can make good revenue with only WordPress, as many are making good money from blogger too..
What I think is…
Success don’t depend on the platform you choose but on what you do.
Your earning depends only on your works, your writing and hard work. Wherever you’re working, work hard with originality and success is for sure.

Please share your valuable views on this topic and tell us how far do you agree or disagree.


Rabu, 03 April 2013

How to add social subscription like box in blogger

When you are providing useful information in your blog, then many times some readers will need to get the latest updates from your blog. For that purpose, you need an social Subscription Form in your blog, so that the interested visitors can easily get the latest updates.

To add social subscription like box to your blogger blog (blogspot) is very easy.This box contains twitter follow me,facebook like button for your facebook page,google+ button and email subscription box.Follow  these steps to add it in your blog.

 
Just follow the next steps:

1. Log in to Blogger, then go to Layout > click on "Add a Gadget" link:


2. From the pop-up window, scroll down and click on the "HTML/JavaScript" gadget:


 3. Paste the following code inside the empty box:

<style type="text/css">
/*<!CDATA[*/

#DBT-mashable{width:265px;margin:auto;padding:0;}

.DBT-googleplus {height: 57px;}

.DBT-facebook {background:#FFFFFF;border: 1px solid #DCDCDC;margin-top: -2px;padding: 5px 10px;}

.DBT-gplusone {background-color: #8181F7;border: 1px solid #d8e6eb;border-top: 1px solid white;font-size: .87em;color: black;padding: 9px 0 0 11px;line-height: 24px;height:30px;}

.DBT-gplusone span {display: inline-block;vertical-align: middle;height: 20px;margin-top: -17px;font-size: 11px;font-family: "Arial","Helvetica",sans-serif;}

.DBT-twitter {background-color: #8181F7;border: 1px solid #c7dbe2;border-top: 0;}

.DBT-twitter a.twitter-follow-button {display: block;}

.DBT-twitter iframe {margin: 9px 11px;}

.DBT-emailbox {background-color: #8181F7;border: 1px solid #b6d0da;border-top: 1px solid #eff5f7;padding: 12px 16px;overflow: hidden;}

.DBT-emailbox form{width:100%;-webkit-box-sizing: border-box;-moz-box-sizing: border-box;-ms-box-sizing: border-box;box-sizing: border-box;border: 0;}

.DBT-emailbox input.emailu {float:left;-webkit-box-sizing: border-box;-moz-box-sizing: border-box;-ms-box-sizing: border-box;box-sizing: border-box;border: 0;color: #999;padding: 7px 10px 8px;width: 100%;-webkit-border-radius: 3px;-moz-border-radius: 3px;border-radius: 3px;font-size: 13px;}

.DBT-emailbox input.emailu:focus {color: #333;}

.DBT-emailbox input.submitu {-webkit-border-radius: 3px;-moz-border-radius: 3px;border-radius: 3px;color: white;padding: 7px 14px;font-weight: bold;font-size: 12px;float: right;cursor: pointer;}

.DBT-emailbox input.submitu:hover {text-decoration: none;}

.DBTYellow{border:1px solid #DBA329;text-shadow:1px 1px 0 #DBA329;background: #dddd2e;background: -moz-linear-gradient(top, #dddd2e 0%, #ffb515 100%);background: -webkit-gradient(linear, left top, left bottom, color-stop(0%,#dddd2e), color-stop(100%,#ffb515));background: -webkit-linear-gradient(top, #dddd2e 0%,#ffb515 100%);background: -o-linear-gradient(top, #dddd2e 0%,#ffb515 100%);background: -ms-linear-gradient(top, #dddd2e 0%,#ffb515 100%);background: linear-gradient(top, #dddd2e 0%,#ffb515 100%);filter: progid:DXImageTransform.Microsoft.gradient( startColorstr='#dddd2e', endColorstr='#ffb515',GradientType=0 );}

.DBTYellow:hover{background: #eaea3c;background: -moz-linear-gradient(top, #eaea3c 0%, #ffb515 100%);background: -webkit-gradient(linear, left top, left bottom, color-stop(0%,#eaea3c), color-stop(100%,#ffb515));background: -webkit-linear-gradient(top, #eaea3c 0%,#ffb515 100%);background: -o-linear-gradient(top, #eaea3c 0%,#ffb515 100%);background: -ms-linear-gradient(top, #eaea3c 0%,#ffb515 100%);background: linear-gradient(top, #eaea3c 0%,#ffb515 100%);filter: progid:DXImageTransform.Microsoft.gradient( startColorstr='#eaea3c', endColorstr='#ffb515',GradientType=0 );}.DBT-moresubs {background: none repeat scroll 0 0 #EBEBEB;border-style: solid;border-width: 1px;border-color: #fff #ccc #ccc;padding: 3px 8px 3px 3px;text-align: right;font-size: 7px;letter-spacing: 1px;}

.DBT-moresubs a {display: inline-block;font-weight: bold;color: #1E598E;text-decoration: none;text-shadow: 1px 1px 1px #fff;}

/*]]>*/

</style>

    <div id="DBT-mashable">
    <div class="DBT-googleplus">
        <script type="text/javascript">
        /*<![CDATA[*/
        window.___gcfg = {lang: 'en'};
        (function(){
            var po = document.createElement("script");
            po.type = "text/javascript"; po.async = true;po.src = "https://apis.google.com/js/plusone.js";
            var s = document.getElementsByTagName("script")[0];
            s.parentNode.insertBefore(po, s);
        })();
        /*]]>*/
        </script>
        <div class="g-plus" data-href="https://plus.google.com/111698402138554597511" data-width="265" data-height="69" data-theme="light"></div>
    </div>
    <div class="DBT-facebook">
        <iframe src="//www.facebook.com/plugins/like.php?href=https%3A%2F%2Fwww.facebook.com%2Fpinkusay&amp;send=false&amp;layout=standard&amp;width=245&amp;show_faces=true&amp;action=like&amp;colorscheme=light&amp;font=arial&amp;height=80" scrolling="no" frameborder="0" style="border:none; overflow:hidden; width:245px; height:66px;" allowtransparency="true"></iframe>
    </div>
    <div class="DBT-gplusone">
        <script type="text/javascript">/*<![CDATA[*/
          (function() {
        var po = document.createElement("script"); po.type = "text/javascript"; po.async = true;
        po.src = "https://apis.google.com/js/plusone.js";
        var s = document.getElementsByTagName("script")[0]; s.parentNode.insertBefore(po, s);
          })();/*]]>*/
        </script>
        <div class="g-plusone" data-size="medium" data-href="http://pinkusays.blogspot.in/"></div>
        <span>Recommend on Google</span>
    </div>
    <div class="DBT-twitter">
        <a href="https://twitter.com/pinkusay" class="twitter-follow-button" data-show-count="true">Follow @techinvent</a>
        <script type="text/javascript">/*<![CDATA[*/!function(d,s,id){var js,fjs=d.getElementsByTagName(s)[0];if(!d.getElementById(id)){js=d.createElement(s);js.id=id;js.src="//platform.twitter.com/widgets.js";fjs.parentNode.insertBefore(js,fjs);}}(document,"script","twitter-wjs");/*]]>*/</script>
    </div>
    <div class="DBT-emailbox">
        <form action="http://feedburner.google.com/fb/a/mailverify" method="post" onsubmit="window.open('http://feedburner.google.com/fb/a/mailverify?uri=pinkusays', 'popupwindow', 'scrollbars=yes,width=550,height=520'); return true" target="popupwindow">
        <table width="100%">
            <tr>
            <td>
                <input class="emailu" name="email" placeholder="Enter your email" type="text"/>
            </td>
            <td width="64px">
                <input class="submitu DBTYellow" type="submit" value="Subscribe"/>
            </td>
            </tr>
        </table>
        <input name="uri" type="hidden" value="pinkusays"/>
        <input name="loc" type="hidden" value="en_US"/>
        </form>
    </div>
    <div class="DBT-moresubs">
        <a href="http://techinvent.blogspot.in/2012/06/how-to-add-mashable-like-social.html/">Get this Gadget</a>
    </div>
    </div> 


Settings :

Replace highlighted text color with your ID

e.g 
 
  • Replace pinkusays with your feed title. It appears at the end of your feed link. In my case it is http://feedburner.google.com/fb/a/mailverify?uri=pinkusays
  • https://twitter.com/pinkusays  with your twitter Id

4. Now Save your widget and check your blog. Enjoy!


Don't Miss These Killer Articles on Facebook:

3.How to Add Scrolling Recent Posts Widget For Blogger?


How to add Copy to/Move to menus in Windows 7

Now here is a wonderful Trick to add Copy to/Move to Menus in Window 7. With this Trick many of your readers will remain on your site for longer periods of time when they see related posts of interest.
 
You can edit windows 7 right click menu by hacking some windows 7 registry. By this you can add new Copy to and Move to menus. After editing registry you will get new menu list. By adding these new menus you need only to choose where you want to copy or move your selected file.
 
 Right-click on a file:
 
Follow These Steps

Before editing any registry backup your registry by  hitting file and export.

backup registry


Go to Start menu ☞ search menu ☞ Then type regedit and hit enter.


Now after opening registry editor search for "HKEY_CLASSES_ROOT\AllFilesystemObjects\shellex\ContextMenuHandlers"


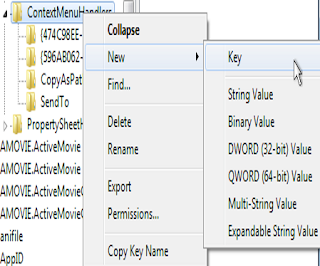
Then right click on ContextMenuHandlers key and select new key and name it Copy to and double click on it and enter value without quotes "C2FBB630-2971-11D1-A18C-00C04FD75D13"

How to add new key to registry


Then again select new key and name it Move to and double click and enter value "C2FBB631-2971-11D1-A18C-00C04FD75D13"
 
Refresh your Computer and check your new context menu. You are Done!
 
If you are having any Query/Clarification in adding code then just comment below to get solution . 


Must Read :- How to Protect your Pc by using Symantec Antivirus?
                        How to Add Meta Tags in Blogger Blog? 
                        How to fix Missing Windows File?